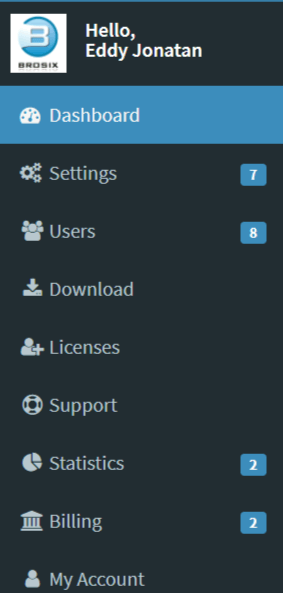
Manage your team network through the Web Control Panel
To manage your private Brosix team network, go to Web Control Panel and log in with your Email address and password.
The following sections are listed in Brosix Control Panel and all of them have different purposes:
- Settings – The Settings section has 7 subsections which allow you to make any group changes for users.
- Users – This section lists all users in your team network and allows you to manage them. More details are available in the create and manage your network users tutorial
- Download – You can download the Brosix application for the OS of your choice for your private team network.
- Licenses – Here you can order licenses and see a summary of all of the licenses that you have purchased.
- Support – You can find different ways to receive support. If you need any Technical or Sales support, please do not hesitate to contact us. We will be happy to assist you.
- Statistics – This section allows you to see statistics related to your team’s network usage.
- Billing – Here you can check payments you have done with Brosix and change your billing information.
- My account – This section allows you to update information about the Network Administrator.
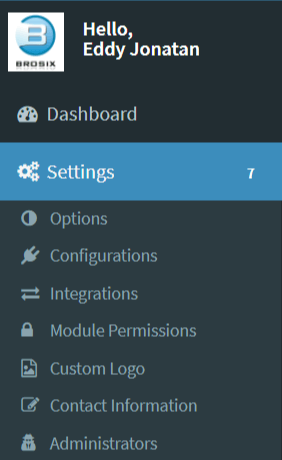
Settings
From this section you can customize your team network in several ways.
- Options – In this subsection you can manage your Network registration options. By using the “Allow new registrations” option, you can grant or deny new registrations in your network in order to control the number of participants or simply to protect it. The option “Any-to-Any registrations” can provide all your network members with each other’s contacts automatically. This will save each user the time it takes to manually add contacts. If the “Allow contacts” option is checked, the users on your network will be able to add other members of the same network to their contact lists through the Brosix application.
- Configurations – Here you can disable or enable the “Welcome Module,” “Chat History” and “Auto Start” features. You can also set up user auto away time here.
- Integrations – You can enable and disable Web Guests,with NET API, you can integrate your systems with Brosix.
- Module permissions – Here you can disable or enable modules for the entire network. Each module represents a feature on the Brosix application. The configuration you make here will be applied to all current and future users. You can enable/disable modules by double clicking on them or by using the buttons at the bottom.
- Custom logo – If Custom Logo is enabled, your company logo will be displayed on the Brosix download site and the Brosix account site. Having your logo in these places will improve your users’ experience as they will have a visual confirmation they are working with your IM network.
- Contact Information – This subsection contains the Administrator’s information, including name, telephone, address, etc.
- Administrators – You can allow access to multiple administrators and choose the level of their participation from this subsection.
Welcome Module – If you enable this option, an extra button will appear in the “Actions” menu of all Brosix applications used by your users. You are able to customize the Title and the URL of this button with, for example, your company’s URL. This will provide your users with quick access to your website at any time. If you check “Show at Start,” the URL will be opened in the user’s web browser each time Brosix is started.
Chat history – If you check this box, all the activity between the users in your team network will be saved, so that you can review it from the Web Control Panel. Brosix will store chat sessions and information about files transferred, calls made etc.
Autostart Module – If enabled, Brosix will always start when the user logs into Windows. The option in the Brosix application will be hidden so the users won’t be able to disable the auto-start.
Users
The “Users” section allows you to add and delete people from your team, restrict access to individual users, and download user chat history.
- User Accounts – You can add and delete new users at any time and also restrict individual users’ access to features and contacts.
- Chat history – You can get reports on the correspondence between individuals or within the whole team within the last 3 months.
- Chat History Archives – If enabled, you will be able to see user correspondence within the last year.
- Groups – Here you can find all groups in your network and create one instantly.
- Chat rooms – You can find all the chat rooms and their details, including participants and names.
- One-to-Any for the network – Here you can enable and disable One-to-Any contacting for individuals or whole team.
- Import/Export – Here you can import users from an Active Directory or other system and export them including their names and email addresses.
- Web Guests – If enabled, you can create communication channels for visitors on your website.
